Your registration has been confirmed. Thank you for signing up!
In this lesson, we will set up a local Sensu development environment for use during the workshop. This lesson is intended for operators of Sensu or anyone who would like to explore Sensu from a technical perspective.
In this lesson we will setup a local Sensu development environment for use during the workshop. This lesson is intended for operators of Sensu or anyone who would like to explore Sensu from a technical perspective.
This workshop was designed with common IT/DevOps/SRE tooling in mind, so we expect most users will already have everything they need installed.
All you need to get started is a laptop or workstation with a git client, Docker, text editor, and a modern web browser.
Please review this list of prerequisites to make sure your system is ready to go:
Workstation
Workshop users will need a 64-bit workstation running a recent version of macOS, Windows, or Linux.
Docker
Docker Compose (docker-compose)
To install docker-compose, please read the “Install Docker Compose” documentation.
Git Client (git)
To install git, please read the git downloads page.
Supported Web Browser
The workshop expects that you have a modern web browser installed. Please verify that you have a recent version of one of these common browsers:
Compatible Text Editor
This workshop involves creating and editing plain-text configuration files and monitoring code templates. We suggest using a text editor such as:
NOTE: Windows users should avoid using Notepad.exe which can save edited files in incompatible encodings.
Optional CLI Tools
The workshop includes examples using some optional CLI utilties:
To fully demonstrate Sensu’s capabilities, it is necessary to have a multi-node environment. This workshop includes a set of containerized components that represent a simplified Sensu-enabled monitoring environment.
We are using docker-compose to automate setting up the local workshop environment.
The containers are configured by a variety of environment variables, defined in the .env file included in the workshop repo.
The docker-compose-default.yaml defines the configuration of the following containers:
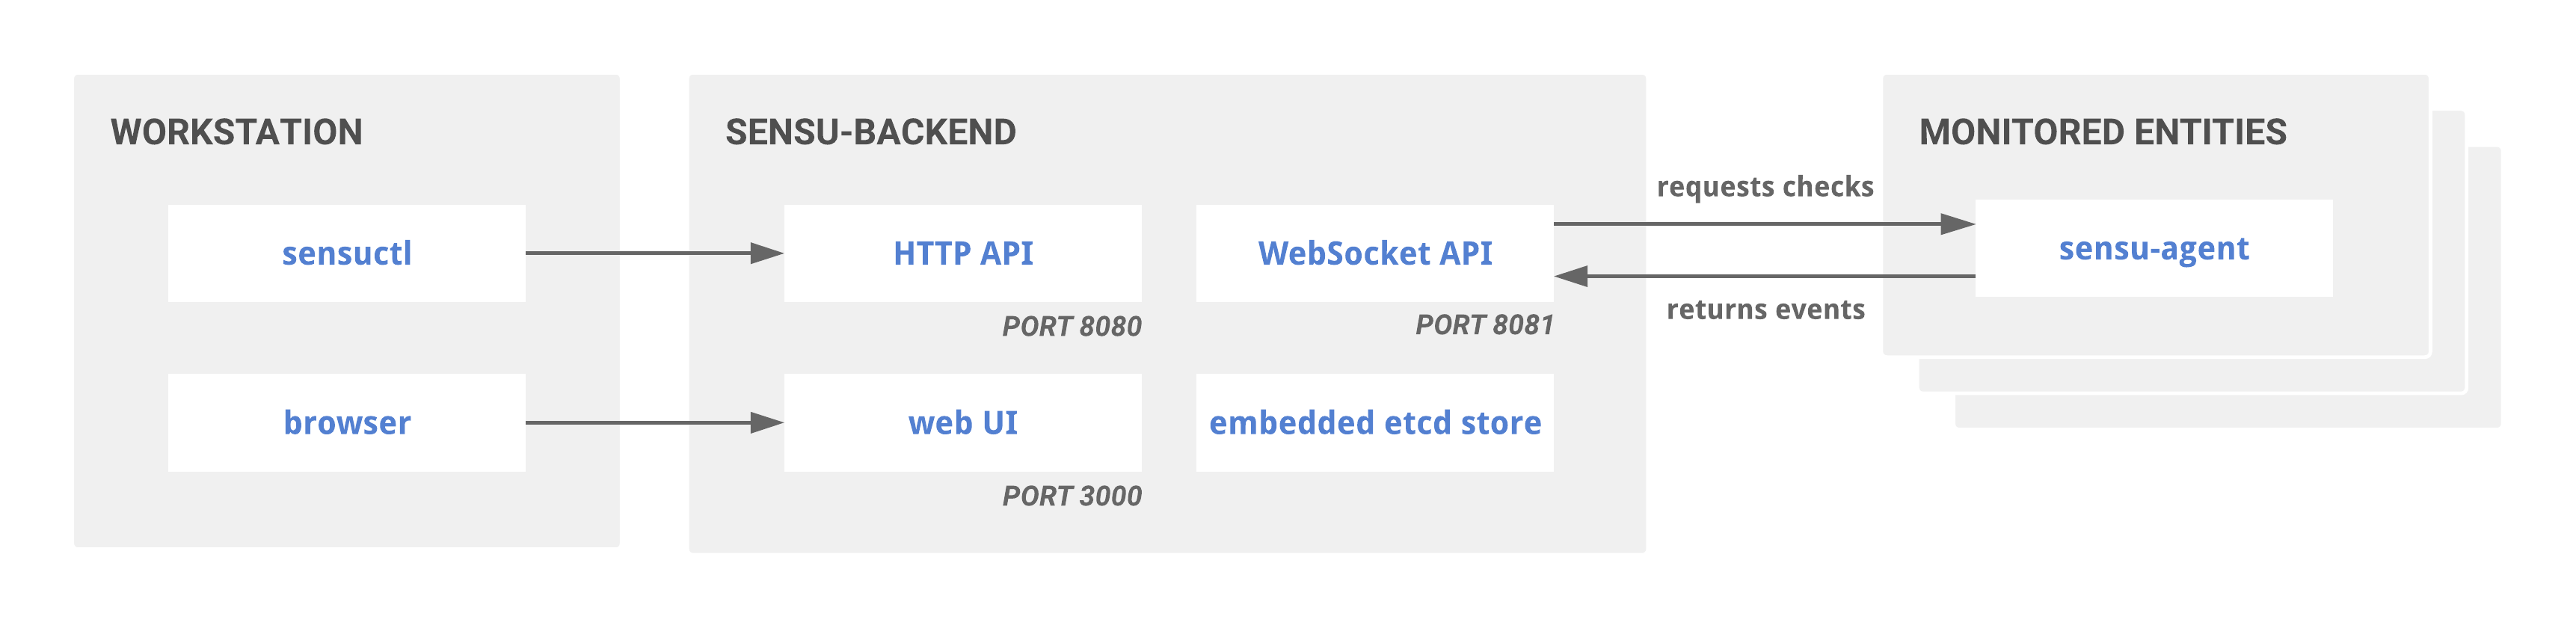
sensu-backend: A Sensu backend, API, and dashboardsensu-agent: A Sensu agent nodemattermost: Mattermost, a web-based chat app similar to Slackvault: A HashiCorp Vault server, for secrets managementconfigurator: A simple configuration management tool built for this workshopThe basic flow of information in this environment looks something like this:
Depending on the configuration, and the details of the event, the backend may raise alerts which are sent to Mattermost, or send events containing metrics to InfluxDb to be recorded. The Grafana dashboard visualizes the metrics stored in InfluxDB.
Access to these third-party services requires authentication. Secrets are securely delivered through HashiCorp Vault directly to the backend.
The configurator runs only during the initial setup of the workshop, to wire everything together and apply the configuration.
You are new to Sensu and are using the Sensu Workshop. You want to mimic a production Sensu environment, so that you can experiment with Sensu concepts and workflows.
To accomplish this, we will setup a local sandbox environment using docker-compose.
Each component will be created within a container running on your local machine.
The installation and configuration is automated for you, so you can start using Sensu right away.
BEFORE YOU START: Make sure that you’ve looked over all the prerequisites, and that Docker is running.
Clone the Workshop Repository.
git clone https://github.com/sensu/sensu-go-workshop.git
cd sensu-go-workshop
Docker Compose Initialization.
Create the workshop environment with the docker-compose up command.
Mac and Linux:
sudo docker-compose up -d
Windows:
docker-compose up -d
NOTE: On Linux/macOS
sudois required because Docker runs as root. If you’d like to configure Docker to not needsudo, read the Manage Docker as a non-root user documentation.
Example Output:
Creating network "workshop_default" with the default driver
Creating volume "workshop_sensuctl_data" with local driver
Creating volume "workshop_sensu_data" with local driver
Creating volume "workshop_timescaledb_data" with local driver
Creating volume "workshop_grafana_data" with local driver
Creating volume "workshop_artifactory_data" with local driver
Creating workshop_vault_1         ... done
Creating workshop_grafana_1       ... done
Creating workshop_sensuctl_1      ... done
Creating workshop_sensu-backend_1 ... done
Creating workshop_artifactory_1   ... done
Creating workshop_timescaledb_1   ... done
Creating workshop_sensu-agent_1   ... done
Creating workshop_configurator_1  ... done
NOTE: The first time you run the
docker-compose upcommand you will likely see output related to the pulling and building of the workshop container images. This process shouldn’t take more than 2-3 minutes, depending on your system.
Verify Your Workshop Installation.
Verify the Docker Containers are Running.
sudo docker-compose ps
The output should indicate that all of the services are Up (healthy) or “completed” (Exit 0).
Example Output:
             Name                        Command                       State                                                         Ports
--------------------------------------------------------------------------------------------------------------------------------------------------------------------------------------
workshop_configurator_1    seed-workshop-resources          Exit 0
workshop_grafana_1         /run.sh                          Up (healthy)            0.0.0.0:3001->3000/tcp
workshop_influxdb_1        /entrypoint.sh influxd           Up (healthy)            0.0.0.0:8086->8086/tcp
workshop_sensu-agent_1     sensu-agent start --log-le ...   Up (healthy)            2379/tcp, 2380/tcp, 3000/tcp, 0.0.0.0:49221->3031/tcp, 8080/tcp, 8081/tcp, 0.0.0.0:49220->8125/udp
workshop_sensu-backend_1   sensu-backend start --log- ...   Up (healthy)            2379/tcp, 2380/tcp, 0.0.0.0:3000->3000/tcp, 0.0.0.0:8080->8080/tcp, 0.0.0.0:8081->8081/tcp
workshop_sensuctl_1        wait-for-sensu-backend sen ...   Exit 0
workshop_vault_1           docker-entrypoint.sh vault ...   Up (healthy)            0.0.0.0:8200->8200/tcp
Every container should show a status of Up (healthy) or Exit 0.
If any containers have the status Up or Up (health: starting), wait a few seconds then retry the sudo docker-compose ps command.
TROUBLESHOOTING:
If any containers have completed with the
Exit 1orExit 2state, it’s possible that these were the result of an intermittent failure (e.g. if thesensu-backendcontainer was slow to start). Re-running thesudo docker-compose up -dcommand will likely resolve the issue.
Check that the Sensu Web UI is Running
The Sensu Web UI should be available at http://127.0.0.1:3000.
Login with the user sensu and password sensu.
Check that Mattermost is Running
The Mattermost app should be available at http://127.0.0.1:5000.
Login with the user sensu and password sensu.
Configure Environment Variables.
The workshop repository includes platform-specific files that export some environment variables which we will use throughout the workshop. The exercises assume you are in a shell that has these variables configured.
When you open a new shell environment, export the variables using one of the following commands:
Mac and Linux:
source .envrc
Windows (PowerShell):
. .\.envrc.ps1
Verify Your Environment.
The Sensu-specific environment variables are prefixed with SENSU. You can verify that you have the Sensu environment variables set up correctly by running one of these commands:
Mac and Linux:
env | grep SENSU
Windows (Powershell):
Get-ChildItem env: | Out-String -Stream | Select-String -Pattern SENSU
The output should include a value for SENSU_VERSION (i.e. a release version such as 6.2.7).
Example Output:
SENSU_VERSION=6.2.7
SENSU_BUILD=4449
SENSU_BACKEND_HOST=127.0.0.1
SENSU_NAMESPACE=default
SENSU_USER=sensu
SENSU_PASSWORD=sensu
SENSU_BACKEND_URL=ws://127.0.0.1:8081
SENSU_API_URL=http://127.0.0.1:8080
NEXT: If all the containers show as Up (healthy) or Exit 0 state, and you can reach the Sensu Web UI and Mattermost apps, and your environment variables are all set, then you’re ready to start the workshop!
In this lesson you installed a local sandbox environment, and verified that it was up and running. You learned about the various components of a Sensu-enabled monitoring environment and how they work together.
In the following lessons, we will install the sensuctl command-line tool, and learn how to do some essential tasks via hands-on exercises using this environment.
Most users have no problems setting up and running the workshop, but sometimes issues do come up. We’ve collected a short Troubleshooting Guide with answers to the most common issues.
If you can’t find your answer there, please reach out by filing a GitHub Issue or asking a question in the Sensu Discourse Forum.
No problem! The workshop can be stopped without losing your progress by running the following command:
Mac and Linux Users:
sudo docker-compose down
Windows Users (PowerShell):
docker-compose down
NOTE: Running
docker-compose downwith the-vflag instructs Docker to also remove the container volumes, which will reset the workshop’s saved information. This is helpful if you want to start over completely.
When you’re ready to start again, just run docker-compose up -d again.
If you’re running into problems, or just curious, you can view the running containers with docker-compose ps.
You can view the log output for any container with docker-compose logs <container_name>.
Check that Docker containers are running:
All Platforms:
docker-compose ps
View logs for sensu-backend container.
All Platforms:
docker-compose logs sensu-backend
It’s common for trainees to do a few exercises in the workshop, pause, and then come back to it later. If you do that, you might need to restart Docker or reload some exported environment variables into your shell.
If something’s not working right, the first thing to check is that Docker and the workshop containers are running, and that you have the expected environment variables set.
Check environment variables:
Mac and Linux:
env | grep SENSU
Windows (PowerShell):
Get-ChildItem env: | Out-String -Stream | Select-String -Pattern SENSU
Feel free to have a look around the sensu-go-workshop GitHub repository.
You can find the Docker configuration files used to setup this sandbox, all the lessons in Markdown format, and much more.
We are constantly evolving the workshop, so you may run across some interesting work-in-progress modules. As usual, we welcome contributions of all kinds!

Made with #monitoringlove by SensuTM in Canada 🇨🇦 and the USA 🇺🇸. © 2017-2021 – Privacy Statement – Terms & Conditions