
If you’re here, it means that your application is a hit, coming through a long way of development and deployments. Your application is finally in a stage where you or your team need to set up more servers than you can handle manually, and you have to provision them fast. There’s also the need to make sure that all of them have the same configuration, packages, and versions in order for your application to have the same behavior in all of them. The application is ready to scale up, and infrastructure as code (IaC) will be the key.
In this post, I’ll showcase a tool that you can use to implement infrastructure as code: Ansible. First, I’ll define IaC, before I dive into Ansible: what it is, how it works, and some examples of how you can use it to make it easy to manage your infrastructure, including integrating monitoring into your IaC workflow, with examples from Sensu and Ansible.
What is infrastructure as code?
We’re living in the age of automation, where almost with a single click you’re able to get a full server up and running. It will include your favorite operating system, applications, security rules, hard drive space, and a myriad of custom settings. When you need it, the server configuration can be replicated dozens, hundreds, or even thousands of times, all without human intervention. Welcome to infrastructure as code, IaC for short.
IaC is a process where instead of manually setting up every server, you define a configuration script with all the required settings and customizations, and a provisioning tool will take care of the rest. Now, let’s explore infrastructure as code tools that will help in this process.
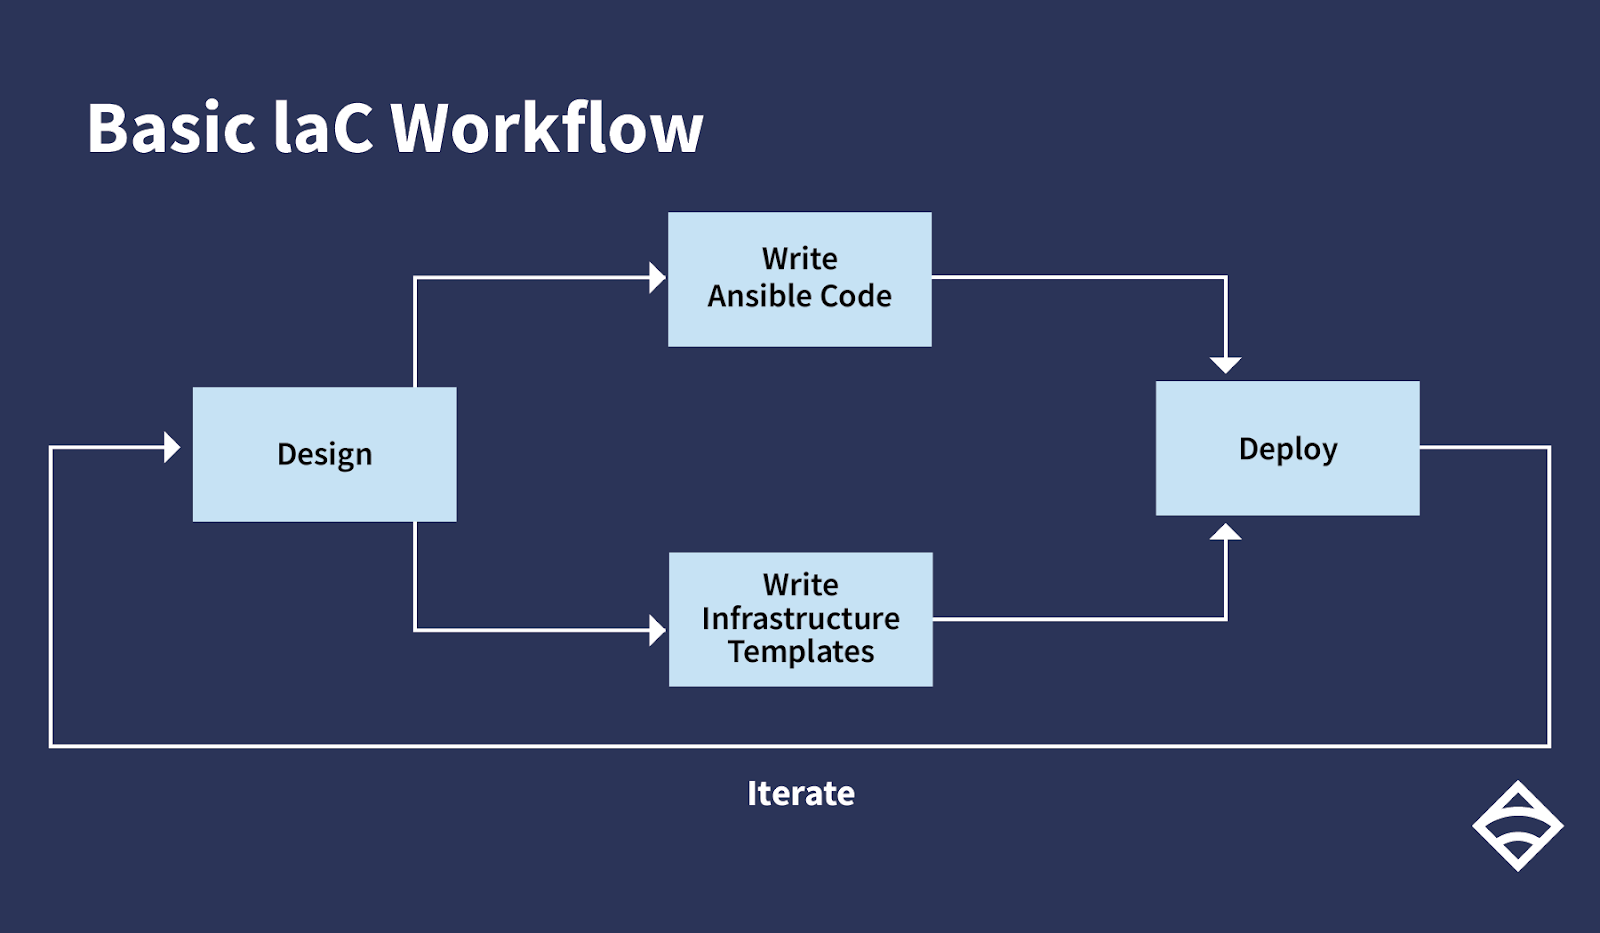 A basic IaC workflow with Ansible.
A basic IaC workflow with Ansible.
What is Ansible?
In very simple words, Ansible is a tool that helps you automate tasks to achieve the desired state in a system. A task can be something as simple as defining a package that needs to be installed, declaring web server settings, or even setting up a full deployment orchestration.
Install Ansible
There are many ways to install Ansible, although the preferred method is by using the package manager that comes with your Linux distribution. For example, to install it in RHEL or CentOS, you only need to execute the following command:
$ sudo yum install ansible
The command will fetch and install Ansible along with all its dependencies.
You can also run Ansible from its source or install it using pip (the Python package manager).
Basic concepts
There are four main concepts that you need to know to work with Ansible:
- Ansible tasks: actions that Ansible will execute.
- Ansible inventory: a list of hosts where Ansible will execute tasks.
- Ansible play: a mapping between groups of hosts in the inventory and tasks to perform
- Ansible playbook: a file with all the plays that Ansible will execute over the inventory. It’s the definition of the state you want the system to have.
The most common way to use Ansible is in push mode. In push mode, Ansible connects to every host in the inventory file and runs all the plays defined in the playbook, running tasks on hosts that are part of a particular play. There is no need for an agent or any other software running in the target hosts. Ansible will connect to them using SSH, although that’s not the only way.
Ansible tasks are meant to be idempotent, meaning it’s safe to run tasks repeatedly without causing additional changes on each run. This means you can run Ansible playbooks many times as you iterate and extend your automation, or some tasks fail, you can re-run the entire playbook again.
This is what a simple Ansible inventory file looks like:
192.168.1.23
[db]
10.2.14.23
[webservers]
server1.domain.com
server2.domain.org
As you can see, it’s just a list of IP addresses and fully qualified domain names. However, it can also include ranges or custom scripts to get all the hosts where the playbooks will be executed. Also, the text you see in squares helps to define a group of hosts. When the playbook indicates a group, Ansible will connect only to the hosts in it.
This is a playbook example from Ansible documentation:
---
- hosts: webservers
remote_user: yourname
tasks:
- service:
name: nginx
state: started
become: yes
become_method: sudo
The playbook tells Ansible to connect to every host in the group webservers using the specified user. Afterwards, it will execute sudo to gain the required privileges to validate that the nginx service is being executed. If it isn’t, the tasks will start it. If the service is already running, nothing will be executed.
As you can see, the playbook is a YAML file. It’s very easy to read, so every person in your team will understand what’s going on with the tasks executed.
We now have an inventory and a playbook. All that’s left is to execute Ansible. This is the way:
$ ansible-playbook playbook.yml
After execution, all hosts in the webservers group will have the nginx service running, almost like magic.
Advanced Ansible tutorial
In the last section, you saw how simple it is to use Ansible, but most of the time tutorials showcase very simple scenarios. Let’s take a look at something more advanced.
After your application is up and running, you need to ensure that it stays that way. You need to have a way to know when things go wrong, not only with your application but with the infrastructure that runs it. In other words, you need monitoring. For our examples, we’ll look at Sensu, an open source monitoring and observability solution.
Note: to follow along, you’ll need to install Sensu.
This is a Sensu example playbook:
---
- name: Install, configure and run Sensu agents
  hosts: all
  become: true
  tasks:
    - name: Install agent
      include_role:
        name: sensu.sensu_go.agent
      vars:
        agent_config:
          deregister: true
          keepalive-interval: 5
          keepalive-timeout: 10
          subscriptions:
            - linux
It’s very simple. It will execute on all hosts, and it will execute the sensu.sensu_go.agent group of tasks (roles define a set of tasks to be executed). Since this is an advanced example, the playbook has a bigger structure, so I will only show another configuration example (and you can always check out the full repository for more examples).
Deploying a check from Bonsai
The following will configure and deploy a simple NTP check using a dynamic runtime asset.
---
- name: Configure NTP Check
  hosts: agents
  collections:
    - sensu.sensu_go
  tasks:
    - name: Create sensu asset
      bonsai_asset:
        auth: &auth
          user: USERNAME  # Replace with Sensu user
          password: PASSWORD  # Replace with Sensu password
          url: http://:8080
        name: sensu/monitoring-plugins
        version: 2.2.0-1

    - name: Create sensu ntp check
      check:
        auth: *auth
        name: ntp
        runtime_assets: sensu/monitoring-plugins
        command: check_ntp_time -H time.nist.gov --warn 0.5 --critical 1.0
        output_metric_format: nagios_perfdata
        publish: true
        interval: 30
        timeout: 10
        subscriptions:
          - linux
Again, this playbook is almost self-explanatory, but there are a couple of more advanced Ansible concepts being used in these Sensu playbooks. First, we are making use of an Ansible collection for Sensu Go: sensu.sensu_go. Ansible collections are a newer concept, a way to package and distribute roles and modules contributed by the Ansible community. You can install collections using the ansible-galaxy tool.
The Sensu Go Collection provides several things including Ansible modules that interact with a Sensu Go backend, as well as Ansible roles to help install the Sensu backend and agent services. Ansible roles are essentially specially structured playbooks to perform a set of tasks, usually associated with a particular service operation. In the playbook example above, the agent role sets up the Sensu Go agent service, taking the desired configuration as an input variable.
Another thing to note: you’ll need to edit the Sensu playbooks to include the Sensu user and password. If you plan to host your playbooks in a public repository, you can securely store secrets like this using the Ansible Vault feature.
There are many other playbooks to install all Sensu requirements on a variety of platforms. The playbook names may be intimidating. Still, I bet you will understand very easily what Ansible is doing. You may just have to set or update some variables and run the ansible-playbook command from the basic example.
Ansible Modules
Ansible looks simple because it comes loaded with a large number of modules. Those allow you to connect and configure plenty of devices on different platforms. If there isn’t a module you need, it’s easy to create new ones and even keep them private.
The last step
We aren’t done yet! Now that you see how the playbooks work, we need to make sure that everybody in your team can see them, as well as update and execute them again if necessary. Since all Ansible configurations are stored in plaintext files, we can just add them to a source control manager. Then, configurations can be improved, updated, or audited. There will be no need to log into each host to review or validate the configuration. But, if it happens for any reason, all you have to do is execute Ansible again.
At this point, I believe you can see the power that comes with automation and how it can help you improve your application development and deployment cycles. Now it’s time to get to work. Have fun!
Related Posts

Automating monitoring with the Sensu Go Ansible Collection
Here's how to create a fully functioning automated deployment of the Sensu Go monitoring agent and backend with the Sensu Go Ansible Collection.

Managing Sensu Go 6 using Ansible
Tadej Borovšak, Ansible Evangelist at XLAB Steampunk, shares his tips on how to prepare your Ansible playbooks for Sensu Go 6.

Using Ansible for configuration management
Ansible is a powerful configuration management tool. Learn how to deploy code & manage system configs without installing agents or complex security tools.

Made with #monitoringlove by SensuTM in Canada 🇨🇦 and the USA 🇺🇸. © 2017-2021 – Privacy Statement – Terms & Conditions